How to Properly Activate eSIM on iPhone for Seamless Connectivity in 2025
How to Properly Activate eSIM on iPhone for Seamless Connectivity in 2025
Understanding eSIM Technology on iPhone
To successfully enable eSIM on your iPhone, it’s essential first to understand what eSIM technology entails. Unlike traditional SIM cards that are removable and require physical insertion, an **eSIM** is embedded directly into your device’s motherboard, allowing for greater flexibility in managing cellular plans. Leveraging this technology can facilitate an easier switch between carriers or plans without the need to visit a store or procure physical SIM cards. In this segment, we’ll discuss the benefits and the technical requirements necessary for the **iPhone eSIM setup** to ensure a smooth activation process.
Key Benefits of eSIM
Activating eSIM offers several advantages for iPhone users. One primary benefit is the ability to manage multiple cellular plans without having to switch physical SIMs, making it particularly useful for frequent travelers who can easily swap between local and home networks. Moreover, **eSIM technology** typically supports 5G, ensuring faster data speeds and improved connectivity. Security is another consideration; since eSIMs are embedded in the device, they’re less prone to theft or loss compared to traditional SIM cards. For those considering a transition, understanding these features can highlight why many users are opting for **how to use eSIM on iPhone** over conventional methods.
eSIM Compatibility: Which iPhone Models Support eSIM?
Before proceeding with the **eSIM activation steps**, it’s crucial to ensure that your iPhone model is compatible. As of 2025, models from the iPhone XS and newer fully support eSIM functionality, facilitating seamless connectivity. Certain earlier iPhone models do not support eSIM, so it’s advisable to verify your device’s compatibility with your carrier. Providers often list supported models on their websites, which can assist in confirming whether you’re ready to enable eSIM on your iPhone. Understanding **eSIM instructions for iPhone** can streamline this transition significantly.
Step-by-Step eSIM Activation Process
Activating your eSIM on the iPhone is generally a straightforward process, but it demands careful attention to detail. The following section will delineate the **step-by-step eSIM activation** process, ensuring you navigate through your settings with confidence. It’s recommended that you gather your new **eSIM activation code** (usually provided by your carrier or found through a QR code) before beginning the process.
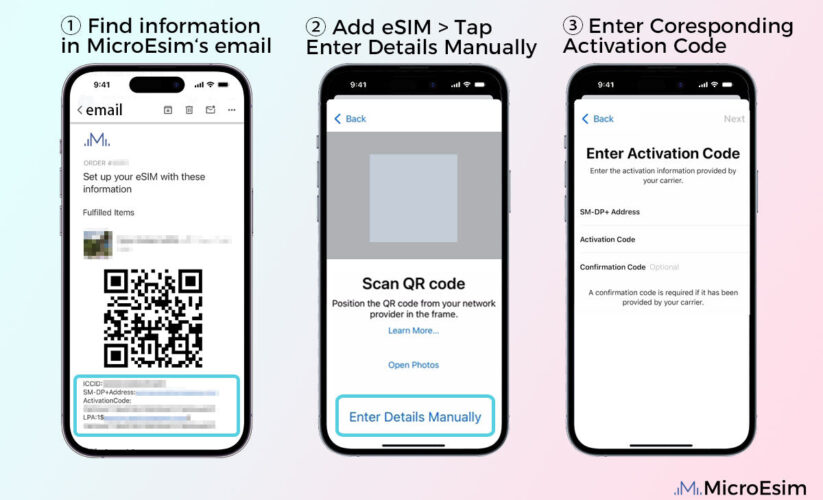
Scan the eSIM QR Code
To activate eSIM on your iPhone, the initial step involves scanning the provided QR code. You can start by navigating to the **Settings** app, then select **Cellular**. From here, choose **Add Cellular Plan** and then use your iPhone’s camera to scan the eSIM QR code. Ensure that you hold the phone steady while scanning to guarantee that the QR code is read accurately. Following this, the plan will be displayed; you can label it according to your preferences for easier management.
Enter the Activation Code Manually
If scanning the QR code isn’t an option, you can manually input the **eSIM activation code**. Simply select **Enter Details Manually** during the activation steps in the **Cellular Settings**. This method requires entering your **SM-DP+ Address** and **Activation Code** provided by your carrier directly into your iPhone. It’s pivotal to enter this information accurately, as errors can lead to activation failures. After entering the details, tap **Next**, and your eSIM should begin the activation process.
Finalize eSIM Settings
Upon successfully entering your information, your iPhone will connect to the network, and your plan will be activated shortly after. Keep an eye on your **cellular data settings** to ensure everything is working as intended. Once the activation is confirmed, you will have the option to keep your physical SIM active or deactivate it if you wish to use only eSIM for your cellular needs. Review and adjust your **esim settings on iphone** to designate your preferred line for data and voice usage if you are managing multiple plans.
Troubleshooting eSIM Activation Issues
Despite following all the **esim activation tutorial** guidelines, you may encounter challenges during the activation process. In this section, we will address common problems when activating eSIM on iPhone and solutions to resolve them effectively.
Common Issues with eSIM Activation
Some of the prevalent issues faced while activating the eSIM include an inability to scan the QR code, receiving error messages, or even the iPhone not detecting the eSIM activation. Ensure that your iPhone’s **carrier settings for esim** are updated, as outdated settings can lead to connectivity issues. Restarting your device can often resolve minor glitches during this process, so don’t hesitate to try this if things aren’t functioning as expected. Always check your internet connection as well; instability can impede the activation process.
Addressing Compatibility Concerns
Sometimes, the problem can arise due to compatibility issues between your iPhone model and the eSIM provided by the carrier. Be sure to **check esim compatibility** prior to activation to avoid such complications. If you discover that your current carrier does not support eSIM with your device, consider switching to carriers that do. Many **major carriers supporting esim** offer enhanced flexibility for managing cellular plans, serving users better in the long term.
Contacting Customer Support for eSIM Services
In instances where the aforementioned troubleshooting steps do not work, reaching out to your carrier’s customer service can be an effective measure. They can offer unique insights and directly assist with specific issues like retrieving your eSIM activation code or verifying your account’s support for eSIM technology. Many service providers have dedicated support for **activating esim service** on iPhone, making resolution easier for users experiencing challenges in activation.
Key Takeaways
- eSIM provides flexibility and convenience for cellular management on iPhone.
- Ensure your device model supports eSIM before attempting activation.
- Follow the detailed steps for scanning or entering activation codes to set up your eSIM.
- Troubleshoot common problems and don’t hesitate to contact customer support for assistance.
- Use settings to efficiently manage your plan once activated.
FAQ
1. What should I do if my eSIM isn’t activating on my iPhone?
If your eSIM isn’t activating, first ensure that you have the correct **eSIM activation code** and check for any updated **carrier settings for esim**. Restarting your device can help reset minor connectivity issues. If problems persist, contacting customer support for your carrier may provide additional help.
2. Can I switch back to a physical SIM after enabling eSIM?
Yes, you can **switch from physical to esim** at any time through your device’s settings. Simply manage your plans and designate which one you want to be active. Ensure to back up any important data associated with your physical SIM before transitioning.
3. How do I manage multiple eSIM profiles on my iPhone?
To manage multiple **eSIM plans** on your iPhone, navigate to **Settings**, then **Cellular**, where you can view all active plans. Tap on each plan for options to change your settings, adjust data usage preferences, and switch between different eSIM profiles seamlessly.
4. What is the process to back up my eSIM data?
Currently, there’s no direct method to specifically back up eSIM settings independently. Ensure you regularly back up your device through iCloud or iTunes, as this can help restore your settings should you face any issues in the future.
5. Are there any limitations to the use of eSIM on iPhones?
Yes, while eSIM enhances flexibility, there are limitations, such as lack of support from certain carriers and potential compatibility issues with older devices. Be sure to verify with your provider regarding the availability of **esim for international travel** as well.
6. Why might my iPhone say “eSIM not detected”?
This error typically appears due to either an incomplete activation process or compatibility issues with your current carrier’s eSIM offerings. Make sure you have entered the prompts correctly and check with your carrier for confirmation regarding account activation.
7. How can I configure my iPhone network settings for eSIM use?
To configure your network settings for eSIM, access **Settings**, then **Cellular**, where you can input your configuration for each of your plans. Always ensure that data settings are correct for optimal usage and functionality.
Following these guidelines ensures you’re equipped to properly **activate eSIM on iPhone** with ease, maximizing the potential benefits of this innovative technology.