How to Clear Cache in Edge: A Simple Guide for 2025 Users
How to Clear Cache in Edge: A Simple Guide for 2025 Users
Caching is essential for speeding up your browsing experience in Microsoft Edge; however, an overloaded cache can lead to performance issues and other troubles. In this guide, we will walk you through the steps for clearing cache in Edge, including a look at some other related tasks like removing cookies and clearing browsing history. Understanding how to delete cache Edge effectively will help you improve your browser performance significantly.
Understanding the Importance of Cache Management in Edge
The cache in the Edge browser plays a crucial role in enhancing your browsing speed by temporarily storing website data. However, over time, this cached data can accumulate, leading to Edge performance issues. Therefore, taking the time to manage and clear your cache regularly is vital for maintaining a smooth browsing experience. Familiarizing yourself with the cache options Edge provides will empower you to troubleshoot and optimize your browser performance effectively.
Benefits of Clearing Cache in Edge
Clearing your browser’s cache can lead to improved performance, reduced page loading times, and enhanced browsing speed. Moreover, regular cache clearing helps in solving unexpected bugs or glitches in the Microsoft Edge browser. This is especially relevant for those of you who may experience frequent Edge caching issues. Another significant advantage of clearing cache is ensuring that you are browsing using the latest versions of websites as cached data can serve outdated information.
Identifying Cache Problems in Edge
It’s essential to recognize when you might have cache problems in Edge. Symptoms like slow loading pages, display issues, outdated content on sites, or even frequent crashes could signify it’s time to perform a cache management Edge action. If you find that performance issues persist even after you’ve cleared your cache, consider looking into Edge troubleshooting options or resetting your Edge settings cache as further measures.
Preventing Cache Accumulation
To maintain optimal browser performance, it helps to adopt a proactive approach towards cache management. You can set reminders to clear browser cache Edge every few weeks or utilize features in Edge that prompt you on routine maintenance tasks. Additionally, understanding Edge storage settings enables you to observe how much cache is being used and manage it accordingly to free up disk space and enhance performance.
Step-by-Step Guide: How to Clear Cache in Edge
Now let’s dive into actionable steps on how to clear cache in Edge. This guide ensures you’re fully equipped to manage your browsing data effectively.
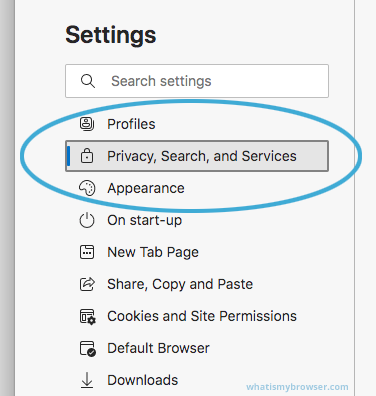
Accessing Edge Settings
To start clearing your cache in Edge, click the three dots located at the top right corner of your browser to open the menu. From the dropdown, select Settings. Once in the Settings menu, navigate to Privacy, search, and services. Here, you will find options associated with Edge browsing data including your cache storage. By selecting choose what to clear, you can then specify the types of data you wish to delete.
Clearing Browsing Data
In the choose what to clear options, you can easily select Cache as a data type to remove. Make sure to check the cached images and files. It’s also a good practice to review options for cookies and browsing history, ensuring you’re completely optimizing your experience. When finished, click Clear now to complete the process. This will help clear temporary files Edge has collected over time and potentially speed up your browsing experience.
Automating Edge Cleanup
For users who wish to automate the process, consider making use of Edge cleanup tools that allow you to schedule regular cleanup tasks. You can also incorporate maintenance tips for Edge such as using extensions that assist with cache options Edge management. Setting up automatic cache clearing can help you stay ahead of any potential speed issues, keeping your browsing efficient.
Privacy Settings and Cache Cleanup
The Edge browser places a strong emphasis on user privacy, which is a key component when it comes to cache cleaning management. By adjusting your Edge privacy settings, you can enhance your browsing experience while also enhancing security.
Managing Edge Privacy Settings
In the privacy settings section, you can control data that Edge collects while you browse. By opting to delete cached images, files, and cookies, you enhance both your performance and privacy. This can be especially beneficial if you’re concerned about Edge data privacy while using various sites online. Ensuring your keys to the Edge browser are aligned with privacy-focused strategies is imperative for a secure browsing experience.
Regular Maintenance for Enhanced Security
Alongside clearing cached data, make it a habit to check your Edge user settings regularly. Update any outdated plugins, remove unused extensions, and adjust browser settings based on your browsing needs. An effective combination of security and performance management can help optimize your use of Microsoft Edge significantly.
Leveraging Cached Data Settings
Microsoft Edge allows you to customize your cached data settings to an extent. Users can choose to toggle settings that determine how long cached files are stored. Adopting a more conservative approach to data caching may occasionally inconvenience you but will ultimately lead to more secure browsing. Options in Edge management settings allow for a better user experience while enforcing privacy controls.
Key Takeaways
- clearing the cache in Edge improves performance and page loading times.
- regularly managing Edge privacy settings keeps your data secure.
- automatic cleanup processes can save effort over time with proper initial setup.
- conduct regular Edge maintenance to keep your browsing smooth.
- staying informed about Edge settings management leads to more efficient usage.
FAQ
1. What is the process for clearing Edge browsing history?
To clear browsing history in Microsoft Edge, access the Settings menu by clicking on the three dots in the upper right corner of the browser. Select Privacy, search, and services, followed by choose what to clear. You can then select browsing history and clear it by clicking Clear now. This keeps your navigation clean and ensures your privacy is maintained.
2. How can I recover deleted cache in Edge?
Unfortunately, once you clear cache and browsing data in Edge, it normally cannot be recovered. Cached data saved on your browser are removed permanently during this process. If retaining some cached items is essential, consider using data recovery tools; however, it’s worth noting that these may not always guarantee a successful recovery.
3. Will clearing cache in Edge delete all my saved passwords?
No, clearing the cache will not delete saved passwords. When managing Edge internet options or clearing browsing data, ensure that you only check the boxes for cached images and files unless you want to clear passwords as well. Always back up sensitive information as necessary to avoid unintentional loss.
4. How often should I clear the cache in Edge?
It’s recommended to clear your cache in Edge every few weeks to ensure optimal performance. Users with heavy browsing habits or those encountering frequent Edge performance issues should do so more regularly. Monitoring your Edge cache space and noticing performance dips can also serve as indicators for routine cache clearing.
5. Can I enable automatic cache clearing in Edge?
While Edge does not have a built-in setting for automatic cache clearing, you can use third-party tools or browser extensions designed for regular maintenance. Additionally, setting up reminders on your device can help maintain a schedule that ensures your cache remains manageable and your Edge experience is optimized.
By understanding these techniques and best practices, users can effectively manage their Edge cache, thereby enhancing performance and maintaining privacy. Make regular cache clearing part of your browser maintenance routine to enjoy a smooth and efficient Internet experience.