How to Start Taking Screenshots on MacBook: A Complete Guide for 2025
“`html
How to Take Screenshots on MacBook: A Complete Guide for 2025
Are you looking to learn how to capture your screen effectively using your MacBook? In this guide, we’ll explore various methods to take a screenshot on your MacBook, including shortcuts, built-in tools, and tips to help optimize your workflow. Whether you want to save a critical piece of information or share visuals with others, we have you covered.
Understanding MacBook Screenshot Options
Before diving into how to screenshot, it’s essential to understand the different MacBook screenshot options available. MacBooks offer multiple ways to capture your screen, catering to varying needs—whether it’s a quick screen capture or a specific area of the display. The built-in screenshot utility Mac is a powerful tool that allows customization and enhancement of your screenshots, making it incredibly versatile for everyday tasks.
Exploring Screenshot Key Combinations
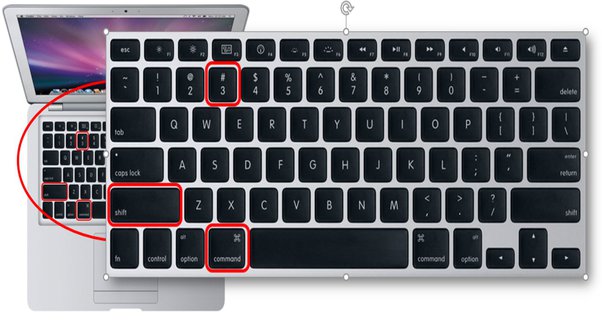
Using a MacBook screenshot shortcut can significantly boost your productivity. The main keyboard shortcuts include:
- Command (⌘) + Shift + 3 – Captures the entire screen.
- Command (⌘) + Shift + 4 – Lets you select a specific area to capture.
- Command (⌘) + Shift + 5 – Opens the screenshot utility, providing options to record your screen or take screenshots with various options.
These shortcuts make it incredibly easy to start taking screenshots instantly without needing any third-party applications.
Using the Screenshot Tool Effectively
The screenshot tool on Mac provides several features such as timer settings and capture mode options. To access this utility, press Command (⌘) + Shift + 5. From here, you’re able to choose if you want to capture the entire screen, a selected window, or a selected portion of your display. Additionally, this tool enables you to set a timer, which is helpful for capturing specific moments or timed presentations.
Editing and Saving Screenshots
After taking your MacBook screen capture, the screenshot thumbnails appear briefly in the bottom corner of the screen, allowing for quick edits. You can click on these previews to annotate or modify the screenshot using built-in tools like Apple Preview. For easy identification, ensure you know your default saving location for screenshots on Mac, which can be adjusted from the screenshot tool’s options.
Taking Screenshots on MacBook: Step-by-Step Guide
This section provides a detailed but straightforward pathway on how to use screenshot on Mac, including practical steps to take effective screenshots.
Step 1: Open the Screenshot Utility
Begin by pressing Command (⌘) + Shift + 5. This opens the screenshot utility, allowing you to choose various options for what you’d like to capture…
Step 2: Select Your Capture Mode
You can opt for a full screen capture, window capture, or select an area to grab. This feature helps in narrowing down exactly what you want to save in your image files.
Step 3: Take the Screenshot
Once you’ve selected the desired area or window, click the “Capture” button to take your screenshot. The resulting image will typically save to your desktop unless you have altered the default settings in the utility.
Common Challenges When Taking Screenshots
Although taking screenshots on your MacBook is generally simple, you may encounter a few hiccups. Understanding these common screenshot challenges and knowing how to troubleshoot can help enhance your experience.
Screenshot Not Saving or Missing
If your screenshot images on Mac are not saving, check your screenshot settings by going to the screenshot tool and ensuring that your save location is set correctly. This could be on your desktop, in documents, or a cloud service.
Inconsistent Screenshot Quality
When utilizing different applications, maintaining screenshot quality might be a concern. Always consider using the built-in tools to preserve image resolution. Using third-party applications might offer additional features, but ensure they won’t negatively impact quality.
Keyboard Shortcuts Not Working
Sometimes, the keyboard shortcuts for capturing screen on Mac might not function as expected. Check if your shortcuts are enabled in System Preferences > Keyboard > Shortcuts, ensuring they are set as per your requirements.
Best Practices for Screenshots on MacBook
To optimize your screenshot-taking experience on your MacBook, consider these actionable best practices.
Organizing Your Screenshots
By customizing where your screenshots save, you can create an efficient workflow. Designate folders or use iCloud for seamless access across your devices, especially useful if you frequently share screenshots with others.
Using Third-Party Screenshot Apps
While the built-in screenshot tools are sufficient for many users, sometimes, additional functionality is needed. Various best screenshot apps for Mac can enhance features such as batch processing and built-in editing tools—applications like Skitch or Lightshot provide user-friendly options for capturing and annotating screenshots.
Sharing Your Screenshots Efficiently
Quickly share your screenshots through various platforms, including email or social media. Use the share button present in the screenshot preview for rapid sharing or copy the image directly to your clipboard for quick pasting anywhere.
Key Takeaways
- Familiarize yourself with the MacBook screenshot shortcuts for efficient screen capturing.
- Utilize the screenshot tool to customize your capture settings and quality.
- Organize your screenshots effectively using folders or cloud services.
- Third-party applications can offer additional features beyond the built-in tools.
- Sharing and editing options are essential for productivity and collaboration.
FAQ
1. How do I change the screenshot location on my MacBook?
You can change the screenshot location by opening the screenshot utility with Command (⌘) + Shift + 5 and selecting the “Options” menu. Here, you’ll find settings to customize where to save your screenshots.
2. Can I take a screenshot of a specific window?
Yes, to take a screenshot of a specific window, press Command (⌘) + Shift + 4, then hit the spacebar, and click on the window you wish to capture.
3. What if my screenshots appear blurry?
If your screenshots appear blurry, check your capture settings and ensure you’re not using a low-resolution display. Most screenshot tools allow image quality settings that should be adjusted to prevent quality loss.
4. How can I take screenshots on a MacBook Air?
Taking screenshots on a MacBook Air is the same as other Mac models. Use the designated keyboard shortcuts for your desired capture method to save screenshots easily.
5. Is there a way to annotate screenshots on my Mac?
Yes, you can annotate screenshots directly from the screenshot preview that appears after taking a screenshot, or using editing tools like Preview apps that allow for drawing and adding text.
“`